Cubit 16.14 User Documentation
The Command Line Workspace is the interface for command interaction between the user and the CUBIT application. The user can enter commands into this window as if they were using the command line version of CUBIT. Journaled commands will be echoed to this screen, even if they were not typed in manually. Thus, if the user wants to know what the command sequence for a particular action on the GUI is, they can watch for the "Journaled Command:" line to appear. In addition, this screen will contain important informational and error messages. The command window has the following three tabs:
The command line workspace emulates the environment in the command line version of Cubit. Commands can be entered directly by typing at the CUBIT> or >>> prompt. This window also prints out error messages, informational messages, and journaled commands.
To enter commands in the command line workspace, the command window must be active. Activate the command window by clicking anywhere inside the window. Commands are typed in at the CUBIT> or >>> prompt. Cubit commands are accepted with the CUBIT> prompt and Python statements are accepted at the >>> prompt. If you do not remember the specific Cubit command sequence you can type help and the name of the command phrase. The input window will show all of the commands that contain that word or phrase. Alternatively, if you know how a command starts, but do not remember all of the options, you can type ? at the end of the command to show all possible command completions. See Command Syntax for an explanation of command syntax rules.
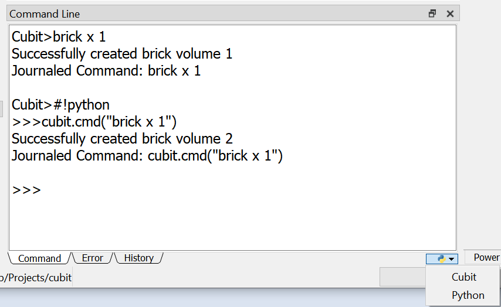
The command window can be in either a Cubit command mode or a Python statement mode. Switching modes can be done with #!cubit to switch to the Cubit command mode or with a #!python to switch to the Python statement mode. A convenience button is also available in the lower right corner of the command window to switch modes with a click of the mouse button.
The Python interpreter in Cubit works as though you were entering lines at the Python command prompt. This means a blank line is interpreted as the end of a block. If you want to add whitespace for clarity, you could add a # mark for a comment on any white line that is in a loop or a class.
A second python script can be included and executed by either using the play Cubit command or by using a Python import statement.
The interface between cubit and Python is the 'cubit' object. Among many methods, this object has a method called cmd which takes as an argument a Cubit command string. Thus the following command can be issued in the Command window at the >>> prompt, which will create a cube with sides 10 units long.
cubit.cmd("create brick x 10")
The following script is a simple example that illustrates using loops, strings, and integers in Python.
%>for i in range(4):
. . x=i*3
. . for j in range(4):
. . y=j*3
. . for k in range(4):
. . z=k*3
. . mystr="create vertex x "+str(x)+" y "+str(y)+" z "+str(z)
. . cubit.cmd(mystr)
This simple script will create a grid of vertices four wide. Scripts can be more advanced, even creating customized windows and toolbars. For a complete list of python/cubit interface commands see the Appendix.
Use the Up and Down arrow keys on the keyboard to recall previously executed commands.
Commands can be repeated in other ways as well.
Beginning with version 13.0, Cubit includes a 'focus follows cursor' option for the command window. The option can be enabled and disabled from the Tools/Options/General options panel. The setting is persistent between sessions and is disabled by default.
Please note, the focus follows cursor behavior is available only in the command window. All other windows or widgets require the user to click the mouse in order to grab focus.
The error window is located in the Command Line Workspace under the Error tab. If there are errors, a warning icon will appear on the tab. The icon will disappear when you open the window to view errors. The error window only displays the error output, which can make it easier to find and read the error output. The command that caused the error will be printed along with the error information. If the command was from a journal file, the file name and number will be printed next to the command.
The history window lists the last 100 commands. The number of commands listed can be configured in the options dialog on the History page. You can re-run the commands in the history window using the context menu. You can also clear the history using the context menu.
The command window can be undocked by clicking and dragging the left edge. If it is floating it can be redocked by double-clicking the solid blue bar. By default, it will always be redocked in the bottom of the application window. To change the size of the floating window, click and drag the edge of the window. To change the height of the docked window, click and drag the top edge or right edge.