Cubit 16.04 User Documentation
The Immersive Topology Environment for Meshing (ITEM) is a wizard-like environment that guides the user through the mesh generation process from geometry definition to export. ITEM was designed to provide a step-by-step set of tools to help new users generate a mesh with very little previous knowledge of the CUBIT program. But ITEM is also flexible enough to accomodate advanced users who want to use a more iterative approach, or who just want to use ITEM for a specific tool or panel.
The main ITEM task page is shown below. To access this page, click on the "wizard hat" icon from the Power Tools window.
Main ITEM Task Panel
The main item tasks are shown both in the text window, and also along the sidebar. The icons in the sidebar are available from any of the ITEM panels. It is acceptable to jump to different tasks during the process, although beginning users may just want to follow the steps in order. To get to the main task page, click on the Task icon on the sidebar during any step in the process.
Many meshing tasks require an iterative approach to the mesh generation process. For your convenience, if you do click on one of the task buttons from a different panel, it will take you to the last visited panel in that section. For example, if you are on the mesh generation page, and you click on the prepare geometry section, it will take you to the last page you visited in the prepare geometry section.
There are two help links at the bottom of the main task page. The first link will open this document which describes the general ITEM process and how to use the panels. This page is only accessible from the main task page. The second link opens the main ITEM documentation which describes each process in the ITEM mesh generation process in detail. This document can be accessed from any of the ITEM panels.
To proceed through the ITEM panels you must either click on a task or click on the "Done" button at the bottom of each page. There is no "Back" button on the ITEM interface. But in most cases, clicking the "Done" button works like a "Back" button.
The item panels are designed to be self-explanatory, with plenty of documentation on each page, and access to more help if needed. However, it does help to be generally familiar with the main types of panels.
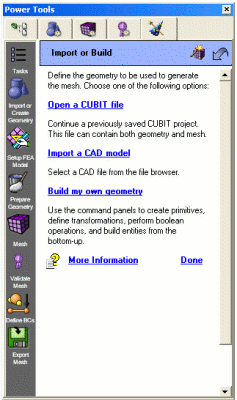
In other cases, the list of tasks is a presents a list of choices, from which you will only select one option. The Import Geometry Page shown below is such an example. It gives a list of different geometry import/creation options and you just select one of the alternatives.
|
Prepare Geometry |
Import Geometry |
A few of the ITEM task panels will provide links to existing control panel topics. Clicking on a link from one of these panels will NOT open a new panel, but will open the corresponding control panel. The Define Boundary Conditions page is an example of this type of panel.
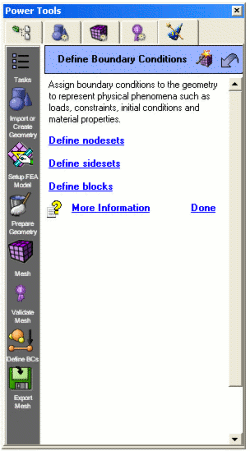
Define Boundary Conditions Panel
A set-up panel is used to provide input or set-up options for your model. The most prominent set-up panel is the Set-up FEA Model page which is used to define mesh budget, element type, and element size. Another set-up page is the Define Metrics page under the Validate Mesh task. This panel is used to define quality metrics for your model. These panels provide useful information for the diagnostics used in other panels.

Setup FEA Model Panel
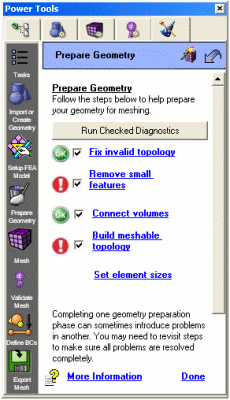
The Small Features Panel shows an example diagnostic panel in ITEM.
Remove Small Features Diagnostic Panel
The Undo button allows you to reverse the most recent command. To enable the Undo button, click on the "Enable Undo" option from the Edit menu. The undo button works by saving information about your model after each step. For large or complex models, this can be time consuming, so you may need to disable the undo feature. Additionally, not all commands are enabled for undo. Many of the graphics and meshing commands, and various default settings are not included. Within ITEM, many commands are bundled into a single button click. Clicking undo will attempt to reverse all of the executed commands. See the command line window for the results of the undo command.
If for any reason, Cubit is unable to complete these steps without further user intervention, the process will stop and the user will directed to continue with the ITEM workflow. For simple geometries, executing the magic mesh button at this phase of the workflow may be all that is necessary to completely define a good quality mesh. For other more complex geometry, considerable user intervention may be required.
The magic mesh button may be executed at any time during the ITEM workflow by selecting the button at the top right corner of the ITEM panel. Once the user has visited the various panels of the ITEM interface to provide user intervention, the automatic execution of the appropriate operations will not longer be attempted.
There are several ways to get help from within the ITEM interface. Most of these have already been discussed, but they are listed here again for reference: