
Cubit 16.04 User Documentation
Note: This feature is under development. The command to enable or disable features under development is:
Set Developer Commands {On|OFF}
The term "mesh cutting" refers to modifying an existing mesh by moving nodes to a cutting entity and modifying the connectivity of the mesh so that the original mesh fits a new geometry. The behavior of mesh cutting is intended to be similar to web cutting in that the process results in a decomposition of the original geometry. The difference is that the decomposition is performed on meshed geometry and results in the creation of virtual geometry partitions. The underlying acis body remains unchanged. The user has the option to determine what is partitioned during mesh cutting: the volume, the surfaces only, or nothing.
The current scope of mesh cutting is limited to cutting hex meshed volumes with planes and extended surfaces. These cutting entities are also limited in that mesh cutting will not work if they pass through a vertex at the end of more than two curves. Mesh cutting does not work on tet meshes or surface meshes.
The steps of mesh cutting include:
The following entities with the associated commands are available for mesh cutting:
A coordinate plane can be used to cut the model, and can optionally be offset a positive or negative distance from its position at the origin.
Meshcut Volume <range> Plane {xplane|yplane|zplane} [offset <dist>]
The planar surface to be used for mesh cutting can also be previewed using the Draw Plane command.
An existing planar surface can also be used to cut the model.
Meshcut Volume <range> Plane Surface <surface_id>
The planar surface to be used for mesh cutting can also be previewed using the Draw Plane command.
Any arbitrary planar surface can be used by specifying three nodes that define the plane.
Meshcut Volume <range> Plane Node <3_node_ids>
An extended surface or "sheet" can also be used for mesh cutting. In this case, the sheet is not restricted to be planar and will be extended in all directions possible. When cutting with an extended surface mesh cutting will ignore all curves and vertices of the surface. Also, the resolution of the mesh will determine how well curved surfaces are captured with meshcutting. A surface with high curvature will not be captured accurately with a coarse mesh. Note that some spline surfaces are limited in extent and may not give an expected result from mesh cutting.
Meshcut Volume <range> Sheet [Extended From] Surface <surface_id>
Note: When cutting with surfaces extended from composite surfaces the default underlying surface approximation may result in a poor final mesh for mesh cutting. This problem can be fixed using the following command:
Composite closest_pt surface <id> gme
See the discussion on composite geometry for a more detailed description of this command.
The following options can be used with all the meshcut commands:
[PARTITION VOLUME|partition surface|no_partition]: By default, mesh cutting will create virtual partitions of the volume being cut to match the cutting entity. This option allows mesh cutting to also create only the surface partitions or create no partitions for the volume or surfaces.
[no_refine]: This option tells mesh cutting not to refine the mesh around the cutting entity.
[no_smooth]: This option tells mesh cutting not to perform the final smoothing step after the cut has been made.
The following is a list of the current scope and limitations of meshcutting.
The figures below show an example of mesh cutting. Figure 1 shows the body that will be meshed. This body is a brick with intersecting through-holes. The steps to create a mesh for this body are listed below.
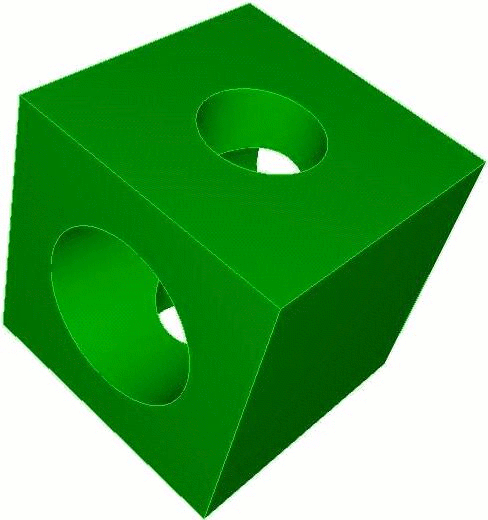
Figure 1: The original, unmeshed body
Step 1: Create a starting mesh. Figure 2 below shows the starting mesh for this problem. The commands for this mesh are:
cubit> create brick x 10
cubit> create cylinder radius 3 z 15
cubit> subtract 2 from 1
cubit> volume 1 scheme sweep
cubit> volume 1 size .75
cubit> mesh volume 1
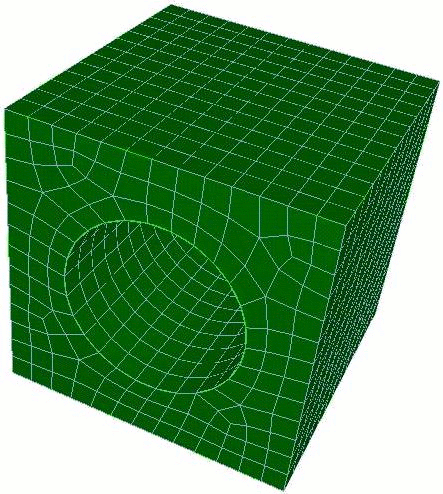
Figure 2: The starting mesh
Step 2: Create a cutting entity. Figure 3 shows the volume that will be used to cut the mesh. The commands are:
cubit> create cylinder radius 2 z 15
cubit> rotate body 3 about x angle 90
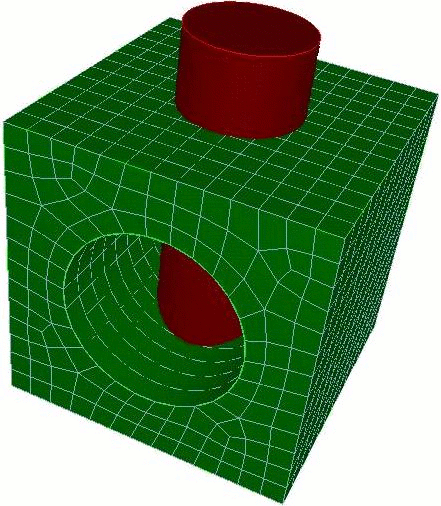
Figure 3: The starting mesh and cutting entity
Step 3: Cut the mesh. Figure 4 shows the new mesh after the original mesh has been cut. At this point we have 3 meshed volumes. The commands for this step are:
cubit> meshcut vol 1 sheet surface 13
cubit> draw volume 1 4 5

Figure 4: The mesh after meshcutting
Step 4: Final step. Figure 5 shows the final mesh after the mesh of the mesh of the two extra volumes is deleted. The commands are:
cubit> delete mesh vol 4 5 propagate
cubit> draw volume 1
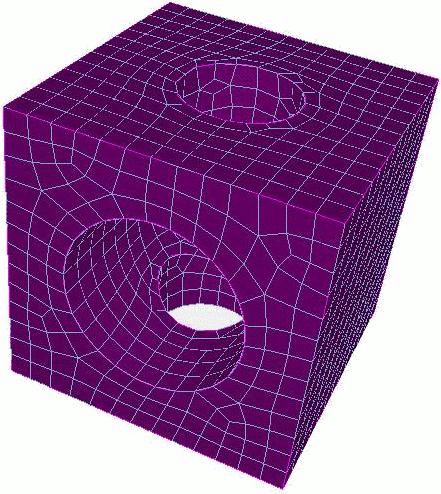
Figure 5: Final mesh after deleting unneeded elements